Tag Manager - Crawl Rate - On Page SEO
How to: Noindex a Page – A Guide to the Robots Noindex Tag


TL;DR:
A noindex directive tells search engines not to include a page in their search results. For HTML pages, the usual method is a robots meta tag such as <meta name="robots" content="noindex">, while non-HTML files can use an X-Robots-Tag HTTP header. Don’t block a noindexed page in robots.txt, because search engines need to crawl it to see the directive. If you can’t modify the HTML or server configuration directly, Google Tag Manager can also be used as a fallback to add noindex with JavaScript.
What you need to know before using noindex
If you don’t want a page to appear in Google’s search results, one of the main ways to control this is with a noindex directive.
The most common implementation is a robots meta tag added to the <head> of the page:
<meta name="robots" content="noindex">
Once Google crawls the page and sees the directive, the page can be removed from Google’s search results.
But there are several important details to understand before adding noindex across a website. You need to know which pages should actually be noindexed, the difference between noindex and nofollow, why blocking a page in robots.txt isn’t the same thing, and how to check that Google can see your directive.
And sometimes you can’t edit the HTML or CMS templates directly. I’ve encountered exactly that problem when working as a website optimisation consultant, so later in this guide I’ll also show the Google Tag Manager workaround I’ve used to add a robots noindex tag when the normal implementation wasn’t available.
What is a noindex tag?
A noindex directive tells search engines that a page should not be included in their search results.
The most common way to implement it is with a robots meta tag in the <head> of the page:
<meta name="robots" content="noindex">You can also target Google specifically using:
<meta name="googlebot" content="noindex">In most situations, however, the general robots directive makes more sense because it applies to search engines that support it rather than targeting Google alone.
It’s important to understand that noindex doesn’t stop a search engine from crawling the URL. The search engine needs to be able to crawl the page and discover the directive before it can act on it.
This is why noindex and robots.txt shouldn’t be treated as interchangeable. If you block a URL from being crawled in robots.txt, Google may be unable to access the page and see the noindex directive you’ve added to it.
Noindex vs nofollow: what’s the difference?
noindex and nofollow control different things.
noindex tells a search engine not to show the page in its search results. nofollow tells supported search engines not to follow the links on the page.
You’ll often see older examples written like this:
<meta name="robots" content="noindex, follow">However, Google treats follow as the default behaviour, so you don’t normally need to specify it. For Google, this is generally sufficient:
<meta name="robots" content="noindex">Similarly, don’t automatically use noindex, nofollow just because you don’t want a page indexed. If links on that page are useful for discovering other pages on your site, nofollow is a separate decision.
Which pages should you noindex?
A noindex directive is useful when a page needs to exist for users or site functionality but doesn’t need to appear as a standalone result in search engines.
Examples can include internal search results, account or login pages, staging or utility pages, certain filtered or parameterised URLs, and duplicate or near-duplicate pages that you deliberately don’t want appearing in search.
But I wouldn’t automatically noindex a page simply because it looks thin, is paginated, belongs to a taxonomy or contains URL parameters.
Some category, tag, filter and pagination URLs can serve a useful search or discovery purpose. The decision should be based on what the page does, whether there’s search demand for it, whether it provides unique value, and whether you actually want it competing for visibility in Google.
Before adding noindex, I’d therefore ask a fairly simple question:
Would I ever want somebody to land on this page from Google?
If the answer is genuinely no, noindex may be appropriate. If the answer is yes, or potentially yes, removing it from the index probably isn’t the solution.
Don’t use noindex as a substitute for canonicalisation
noindex and rel="canonical" also solve different problems.
A canonical tag indicates which URL you consider representative when multiple URLs contain the same or very similar content. noindex tells search engines that you don’t want a particular page appearing in search results.
So I wouldn’t automatically noindex every duplicate URL that has a canonical pointing elsewhere. First decide whether you’re trying to consolidate duplicate URLs or remove a page from search altogether.
That distinction is particularly important on ecommerce sites and other large websites where filters, parameters and faceted navigation can create many variations of the same underlying content.
How to add a noindex tag to a page
The simplest and most reliable way to noindex an HTML page is to add a robots meta tag directly to the <head> of the page:
<meta name="robots" content="noindex">Once a search engine crawls the page and processes the directive, it can remove the URL from its search results.
If you’re using a CMS such as WordPress, you may not need to edit the HTML directly. Your SEO plugin or CMS may provide a page-level setting that adds the robots meta tag for you.
Whichever method you use, check the rendered HTML afterwards to make sure the directive is actually present on the pages you intended to noindex.
How to noindex non-HTML files with X-Robots-Tag
A robots meta tag works for HTML pages because it can be added to the page’s <head>. For other resources, such as PDF files, you can use the X-Robots-Tag HTTP response header instead.
For example:
X-Robots-Tag: noindexThis allows you to apply a noindex directive at HTTP header level rather than adding HTML to the resource itself.
X-Robots-Tag can also be used with HTML pages, although for a normal webpage I’d generally use the robots meta tag unless there’s a technical reason to control indexing through the server response.
Don’t block a noindexed page in robots.txt
If you want Google to discover a noindex directive, it needs to be able to crawl the URL.
Don’t add noindex to a page and then block the same URL in robots.txt. If Google can’t crawl the page, it may not be able to see the noindex directive.
How to add a noindex tag with Google Tag Manager
Adding noindex directly to the page or through your CMS is preferable because the directive is present in the HTML when the page is served.
But sometimes you don’t have that level of access.
I’ve worked on sites where technical limitations meant I couldn’t easily add or change robots directives on the specific URLs I wanted to control. In situations like that, Google Tag Manager can provide a workaround by adding the robots meta tag using JavaScript.
I wouldn’t use GTM as my first choice for implementing noindex, but it’s a useful option when changing the underlying HTML or CMS isn’t practical.
A real example of implementing noindex with GTM
To demonstrate how this works, I originally used the contact page on this site as a guinea pig.
Before making the change, the page was indexed by Google. I could confirm this in Google Search Console and by checking the robots directives being output on the page.

You can also use Google Search Console to check a page’s indexed status:
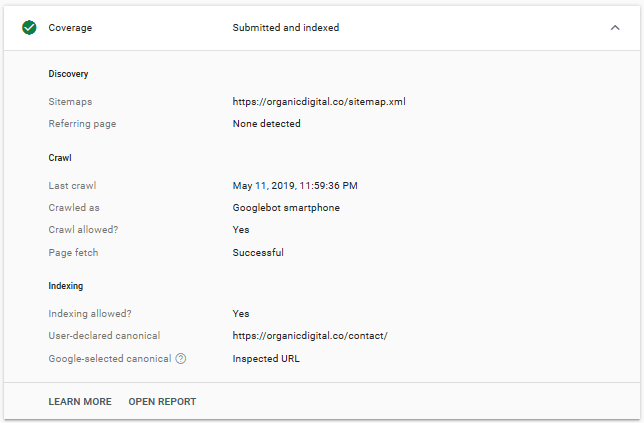
When viewing the source code, you can see the robots index tag in place:

Create the noindex tag in Google Tag Manager
This assumes Google Tag Manager is already installed on the site. If it isn’t, implement and test GTM before using it to control something as important as indexing.
Create a new Custom HTML tag containing the JavaScript that adds the robots meta tag to the document <head>.
<script>
  var metaRobots = document.querySelector('meta[name="robots"]');

  if (!metaRobots) {
    metaRobots = document.createElement('meta');
    metaRobots.setAttribute('name', 'robots');
    document.head.appendChild(metaRobots);
  }

  metaRobots.setAttribute('content', 'noindex');
</script>
This script first checks whether the page already contains a robots meta tag.
If one doesn’t exist, it creates one and adds it to the <head> of the page. It then sets the content of the robots tag to noindex.
This is preferable to my original implementation, which simply removed the existing robots tag and created a new one using jQuery. The updated version doesn’t require jQuery and handles both situations, whether a robots meta tag already exists or needs to be created.
Google can process robots meta tags added using JavaScript, but I still consider this a fallback rather than the preferred way to implement noindex. If you can add the directive directly through the HTML, CMS or HTTP response, I’d do that instead. Google itself recommends avoiding JavaScript for changing meta tags where possible.

Choose which pages should fire the noindex tag
The trigger is the most important part of this implementation because it determines exactly which pages receive the noindex directive.
Create a trigger that only matches the URLs you deliberately want to remove from search.
For example, if you wanted the tag to fire on every URL within:
/blog/tags/
you could create a condition where Page Path contains /blog/tags/.
If you only want to noindex a specific page, use a more precise condition that matches that page rather than a broad URL pattern.
Do not configure the tag to fire on every page.
A mistake here could add noindex across large parts of the site, potentially removing important pages from Google’s search results.

Test the noindex tag before publishing
I cannot stress this enough, test the tag thoroughly before publishing it.
Use GTM’s Preview mode to check pages that should receive the noindex directive and, just as importantly, pages that shouldn’t.
Once you have tested the arse off this across various pages and are happy that the tag only fires on the desired pages, publish your changes.
How to check the noindex tag is working
Because the robots meta tag is being added with JavaScript, you won’t see the change if you simply use View Source. That shows the HTML originally returned by the server, before Google Tag Manager has modified the page.
Instead, open your browser’s developer tools and inspect the rendered HTML. Look inside the <head> and check that the robots meta tag has been added:
<meta name="robots" content="noindex">

Once the tag is live, you can also use URL Inspection in Google Search Console to check how Google sees the page.
Remember that adding noindex doesn’t instantly remove a URL from Google’s index. Google needs to crawl the page and process the directive first. If you’ve made the change to an individual URL, you can use URL Inspection to request recrawling.
Once Google has processed the directive, Search Console may report the URL as excluded because of a noindex tag.
If the page remains indexed, check that Google can crawl the URL, that it isn’t blocked by robots.txt, and that the noindex directive is present in the rendered page when Google processes it.
Should you use Google Tag Manager to add noindex?
If you can add a robots meta tag directly to the HTML, configure it through your CMS, or use an X-Robots-Tag HTTP header, I’d choose one of those methods before using Google Tag Manager.
GTM is useful when those options aren’t available, and I’ve successfully used it as a workaround on sites where I didn’t have sufficient control over the underlying templates.
But you’re using JavaScript to control whether pages can appear in search, so there are more moving parts and more opportunities for something to go wrong.
That’s why the trigger configuration and testing are so important. A GTM rule that accidentally adds noindex to the wrong pages can cause considerably more damage than the indexing problem you were trying to solve.
Final thoughts on using noindex
noindex is a useful way to control which pages you want appearing in search results, but it isn’t something I’d apply indiscriminately to every duplicate, thin, filtered or parameterised page.
First decide whether the page genuinely has no value as a search result. If it doesn’t, add the noindex directive using the simplest and most reliable method available to you.
For most HTML pages, that’s a robots meta tag. For non-HTML resources such as PDFs, an X-Robots-Tag HTTP header may be more appropriate. And if you can’t modify the page or server configuration directly, Google Tag Manager can provide a useful workaround.
Whichever method you use, test the implementation carefully and make sure you’re only excluding the URLs you actually intend to remove from search.
If you’re dealing with a larger indexing problem and aren’t sure which pages should and shouldn’t be appearing in Google, that’s something I regularly investigate as part of my website optimisation and SEO consultancy.

categories
- Analytics Insights
- Crawl Rate Insights
- Ecommerce SEO Insights
- International SEO Insights
- Keyword Research Insights
- Local SEO Insights
- Migrations Insights
- News Insights
- On Page SEO Insights
- Performance Analysis Insights
- SEO Audits Insights
- Site Speed Insights
- Structured Data Insights
- Tag Manager Insights
- Wordpress SEO Insights
latest posts
How To: Track GA4 AI Assistant Traffic, Including Historical Data

A Rough Guide To: LLMS.txt - What It Is & How To Create One
How To: Build SEO Content Hubs for Topical Authority

Case Study: Do Keywords in URLs Help SEO Rankings?

How To: Track Google Business Profile Traffic in GA4

get in touch
If you need some expert website optimisation and configuration, want to find out more, or even just have a question, fill in the form below as I will always be happy to help